The Ninjachat Software is a powerful and easy-to-use tool that can help you streamline your customer service process and generate more sales leads. With its simple and intuitive interface, the Ninjachat Live Chat Software is the perfect tool for any business that wants to provide excellent customer service and generate more sales.
NinjaChat is the best live chat app for website owners who want to engage directly with their customers. It offers services like answering queries, fixing problems, and engaging leads. No HTML or programming skills are required to create multiple agents and customize the design of your live chat widget.
We see a lot of customers service sales, business owners, and self-entrepreneurs, using it
Example: As a business owner, you can integrate Ninjachat with the live chat window and start designing a chat window in a minute
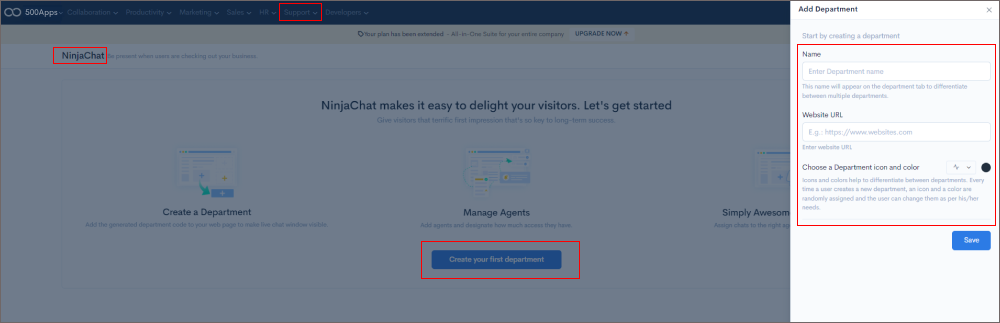
Go to infinity.500apps.com > Find Support on the top section of the suite > Select NinjaChat Create your Function > Enter the Department Name, URL Save it
It is important to add customers to the Dashboard because they provide valuable information that can help improve the business. Customers can give feedback about their experience, what they liked and didn't like, and what they would like to see in the future. This feedback can be used to make changes and improve the business.
Click your Function > Add Project
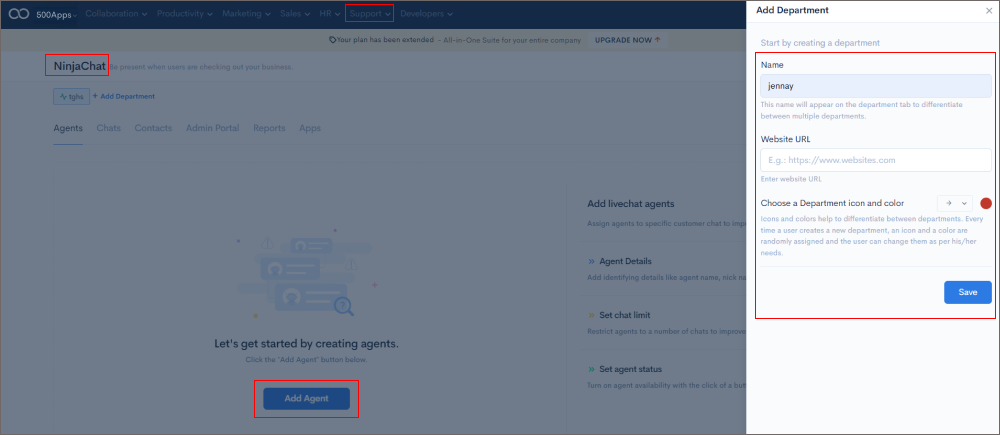
It explains how Ninjachat adds agents through the agents, as well as the simultaneous chat, list view, grid view, and go active features.
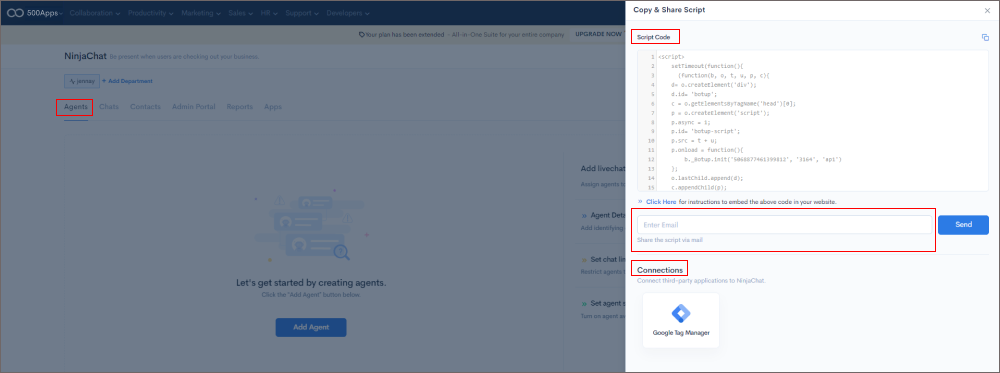
The script code can be copied and shared via email and integrated with third-party applications
The purpose of Agent settings is to provide a way for you to customize how your Agent behaves. This includes things like what events to collect, how to instrument your code, and what data to collect. By relying on Agent settings, you can be sure that your Agent is always collecting the data that you need.
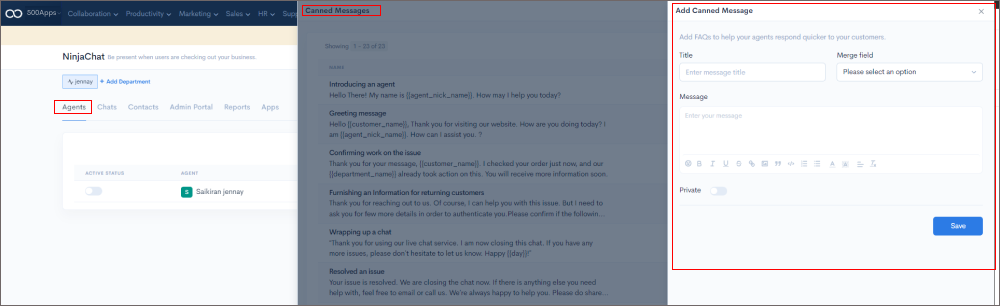
The following session demonstrates how NinjaChat can configure your settings and how to add canned messages. Learn how to use Chat widgets to customize your live chat window with UI settings. Also, understand how to use tags and webhooks to send requests for any chat events.
Click on your function > Select Setting > Canned messages > Add Canned Message by your Name, Template.
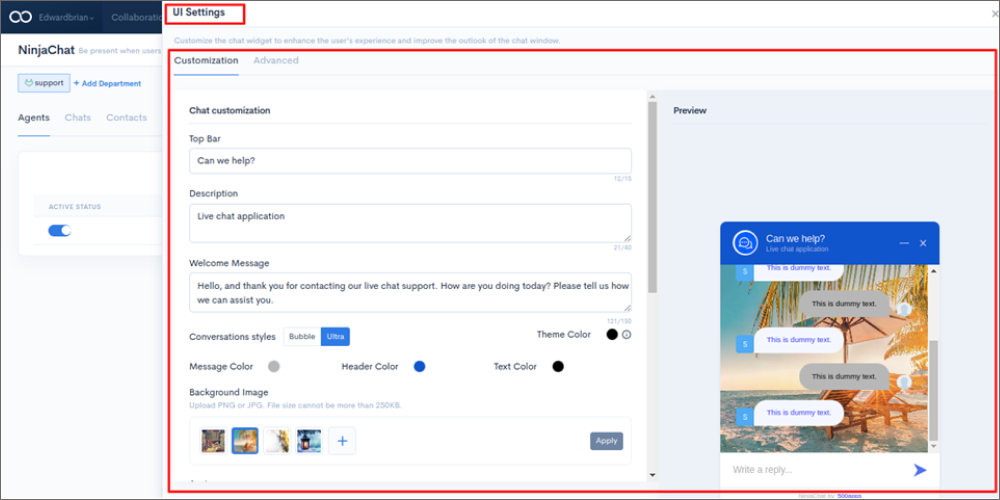
Customize the chat widget to enhance the user's experience and improve the outlook of the chat window.
Click on your Agent function > Setting > UI Setting > Add Canned Message by your Title, & Template.
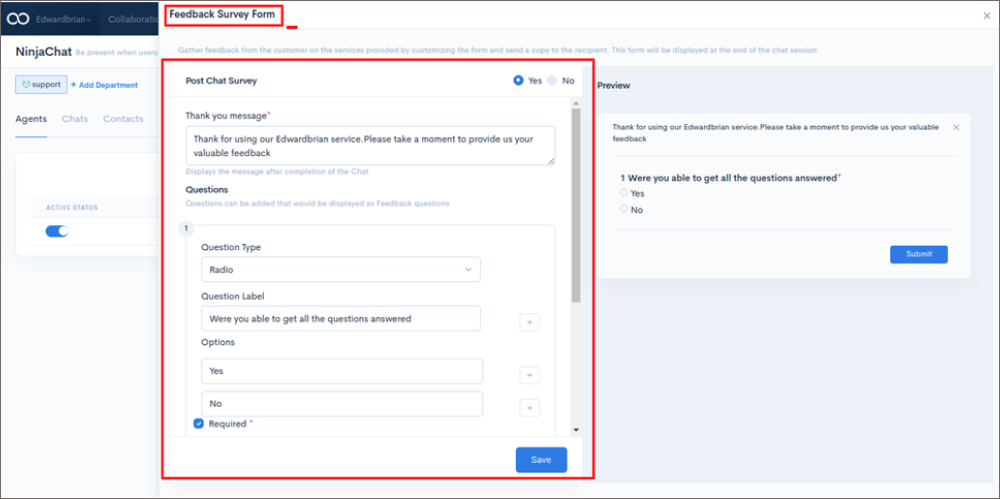
You can use post-survey after the chat is completed & you can see question type
Click on your function > Select Feedback
The online form settings page is where you will go to configure your form. This is where you will set the width, height, and background color of your form. You will also set the default values for the fields on your form.
Click on your Function > Select Setting > UI Setting > Click Online Form Add Welcome Message> Enter Fields > Save it
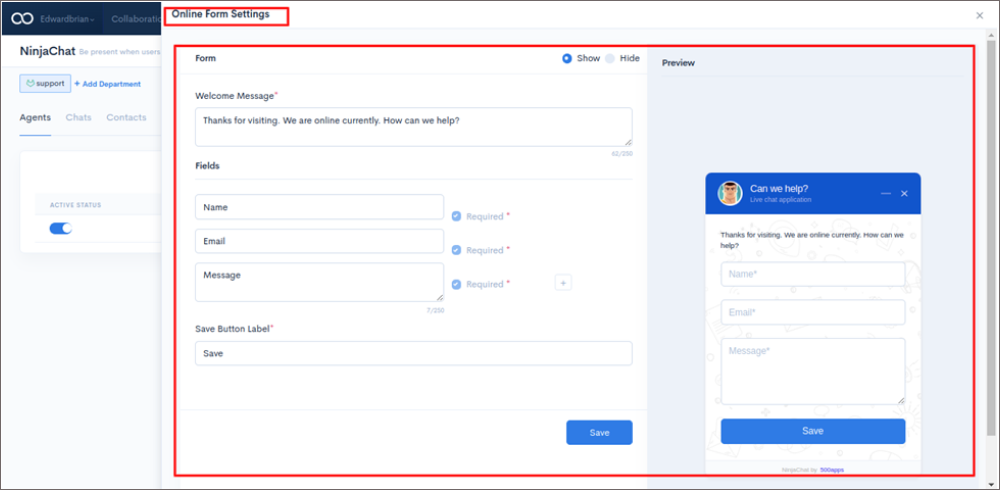
The purpose of online form settings is to make it easy for people to fill out and submit forms on your website.
There are several settings that you can adjust to control how forms behave on your site. One setting that you can adjust is the submit button. You can change the text that appears on the button, the color of the button, and the position of the button. You can also choose to have the button open the form in a new window or tab.
Another setting that you can adjust is the response message. This is the message that people will see after they submit a form. You can customize the message to thank people for their submissions or to give them instructions on what to do next.
You can also choose to redirect people to a different page after they submit a form. This can be useful if you want to send people to a thank you page or to a page with more information about what they just submitted. Finally, you can adjust the email settings for forms. This includes the From address and the Reply-To address.
You can also choose to cc or bcc people when a form is submitted. adjusting these settings will help you to control how forms behave on your site. By customizing the settings.
You can use the Form Settings dialog box to specify options for an offline form, such as the name of the form and the directory in which to store the form data. To access the Offline Form Settings dialog box,
Click on your Function > Select Settings > Offline form > Add Template of your wish to add as per Requirements.

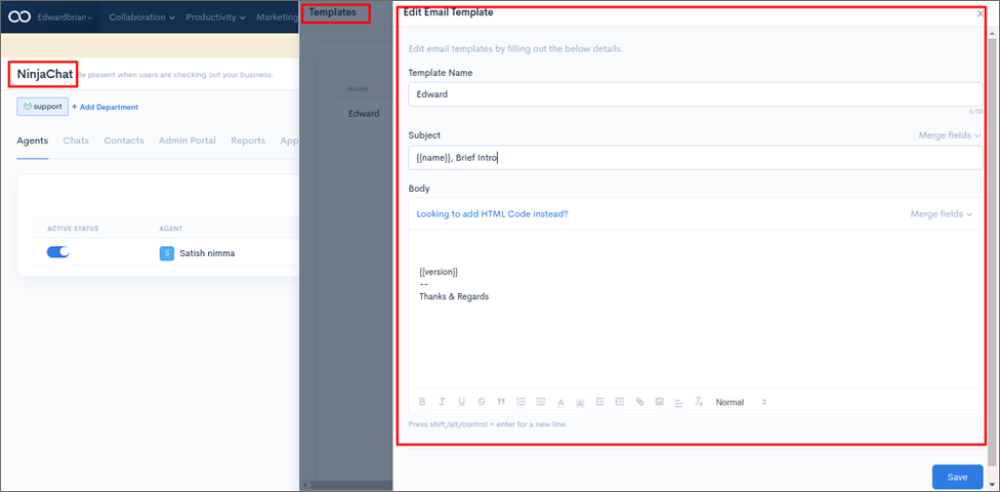
A template is a file that serves as a starting point for a new document. When you open a template, it is pre-formatted in some way so that you can start adding content to it without having to do any work to set up the basic layout.
Click on your Function > Select Setting > UI Setting > Click Email Template
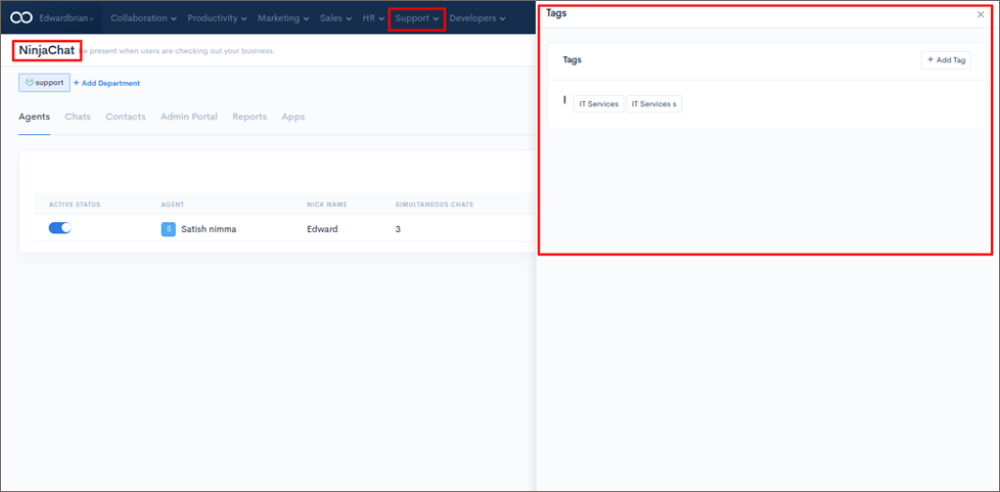
Tags are a great way to organize your thoughts and ideas. They can be used to categorize, label, and keep track of information. Tags can be used in both personal and professional settings.
For example, you might use tags to keep track of your to-do list, or to label files and documents. In a professional setting, tags can be used to keep track of projects, clients, or tasks. Tags are versatile tools that can be used in a variety of ways.
Click on your Function > Select Setting > Tags > Add your Template
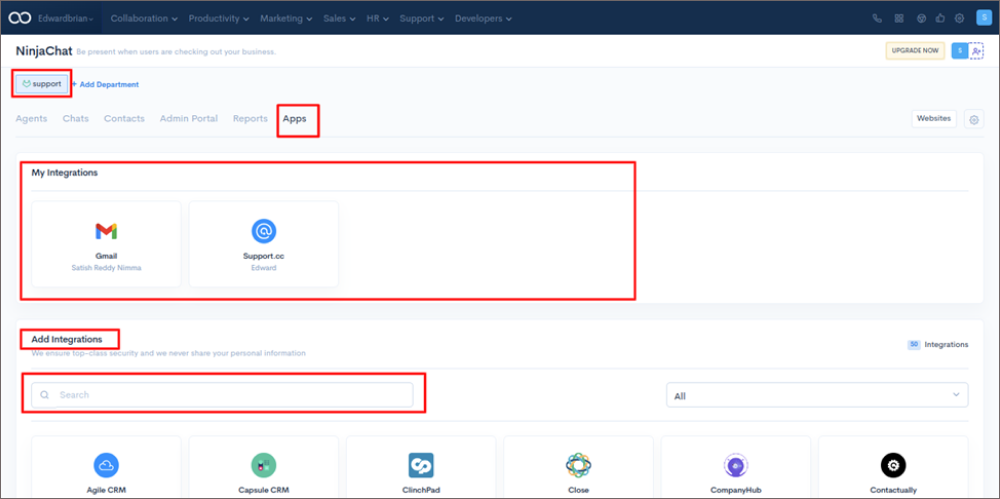
Integrating your app with Gmail allows your users to access your app's features and content directly from their Gmail inbox.
This integration can be used to provide a more seamless experience for your users, as well as to make it easier for them to access your app's content.
There are a few different ways to integrate your app with Gmail. One option is to use the Gmail API to create a custom integration.
This option gives you the most control over how your app appears and functions within Gmail, but it requires some development work.
Another option is to use one of the existing Gmail integrations, such as the Google Calendar or Google Drive integration. This option is much easier to set up, but it is less customizable.
Once you have decided how you want to integrate your app with Gmail, you will need to create a project in the Google Developers Console and enable the Gmail API. After that, you can follow the instructions for your chosen method of integration.
Click on your Function > Setting > Select Apps > Integrate Apps
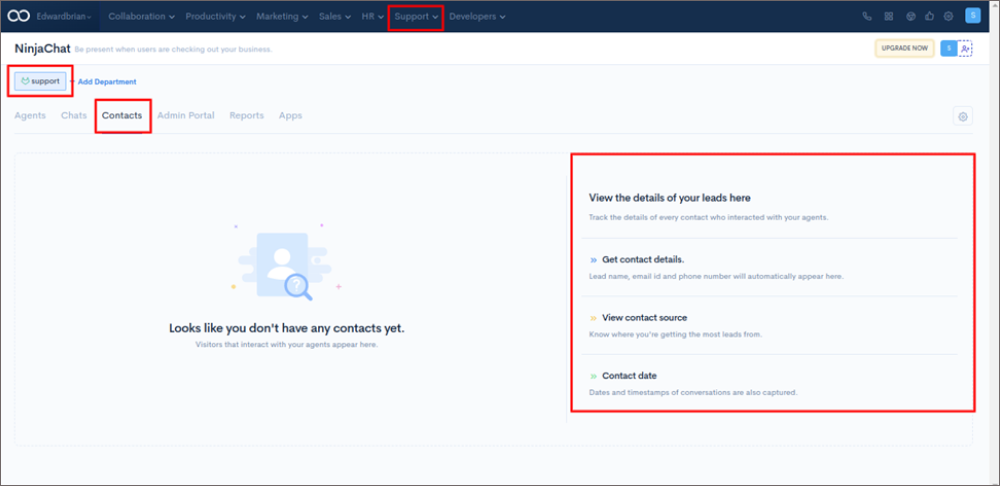
You can view, manage and track the details of your leads by logging into your contact management system. From here, you will be able to see the name, from URL, Referrer URL, IP Address, City, Resolution, Device, and OS, of each lead, as well as the source of the lead and the date and time of the last interaction.
Click on your Function > Select Contacts Select Add Contacts > Managing Contacts

When you're managing your chats, you have a complete record of every interaction. You can see the contact's name, email, and associated agent at a glance. You can also preview all chat conversations. Additionally, chat metrics can be used to inform your next plans.
Click on your Function > Add Chats > Managing Chats
This session demonstrates how to view all recorded chats through the chats tab on NinjaChat. You will be able to filter the chats by name, email id, tags, and created date for easy navigation.
This also covers the list view, grid view, name, message, no. of lines, duration, closed by, and most importantly chat transcript. The chat transcript will include information on where the visitors are coming from, URL, IP address, and Conversation History with chat mode, and text mode.
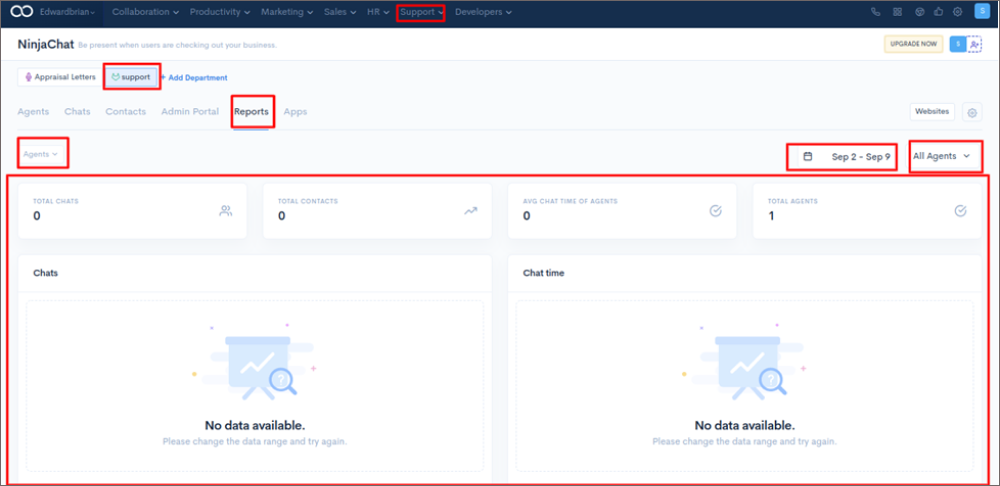
This Session explains how to filter your reports by date and agent to monitor agent performance through the reports tab.
Click on your Function > Select Reports Add Reports > Managing Chats
It also shows how to use the overall chats attended by agent, contacts, average chat time, total agents, agent-contact information, and agent chat with graphical representations to get a more detailed understanding of your data.
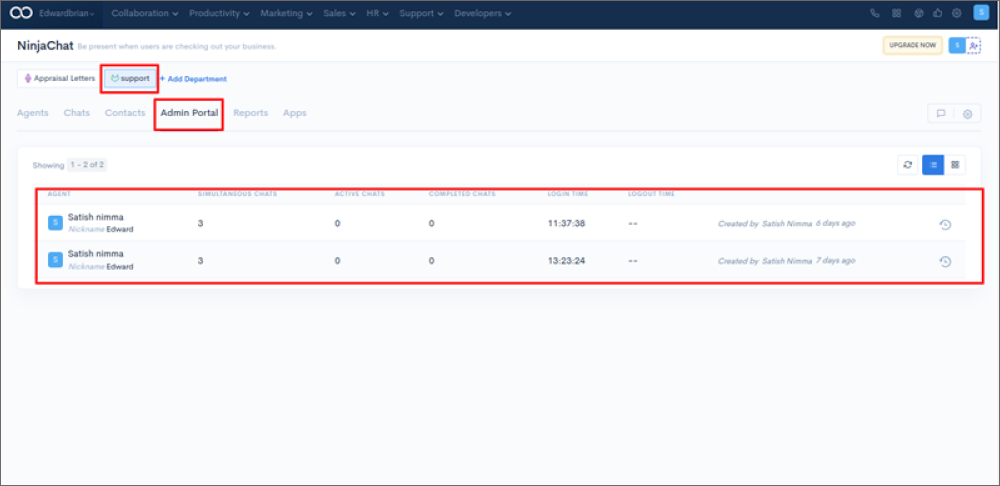
The Admin Portal is a great way to keep track of your customer service agents' performance.
You can see how many chats they are handling at once, how many active chats they have, and how many chats they have completed. You can also see their login and logout times, so you can track their overall activity.
Click on your Function > Select Admin Portal Click Websites > Managing Chats
Hope the above step by step guide helps you to use our apps fully to grow your business.
We’ve helped more than 30,000 businesses grow like the Fortune 500 and yours can be the next.
We have an app-wise getting started page as well. Please go through it for more details on individual apps.
Thank you.
Go to the next level with ![]()
Get 50 other apps with Ninjachat - Join the SaaS Revolution - 500apps, $14.99/user flat pricing, 24/5 Support (Phone/Email/Onboarding)
